Managing emails can be a challenging task, especially for businesses. Missed emails can lead to lost opportunities or unsatisfied customers. That’s where a catch-all email address comes in handy. It ensures that you receive all emails sent to your domain, even if the sender misspells part of the email address. Setting up a catch-all email account in cPanel is straightforward, and in this blog, we’ll discuss the process step by step. LEt get started.
This blog is a part of our cPanel server management services where we make sure your cPanel server works efficiently with any issues.
Table of Contents
What is a Catch-all Email Address?
A catch-all email address is an inbox that captures all emails sent to any address under a specified domain, as long as the specific address doesn’t exist. For instance, if someone sends an email to info@yourdomain.com and another email to support@yourdomain.com, both will end up in the same catch-all inbox if neither of those specific addresses has been set up as individual accounts.
Why Set Up a Catch-all Email Address?
- Prevent Missing Emails: It catches all misdirected emails that might have been sent due to a typo in the address.
- Simplify Email Management: Businesses can manage email inquiries from one central account, rather than multiple specific accounts.
- Security: Monitor for misuse or malicious activity directed at randomly addressed emails to your domain.
Steps to Set up a Catch-all cPanel Email Address
1. Log into cPanel: Open your web browser and go to your cPanel login page. You can usually get there by adding ‘/cpanel’ to the end of your website’s address (like this: https://yourdomain.com/cpanel). Enter your cPanel username and password to log in.

2. Find the Email Section: Once you’re logged in, look for the ‘Email’ section in your cPanel dashboard.

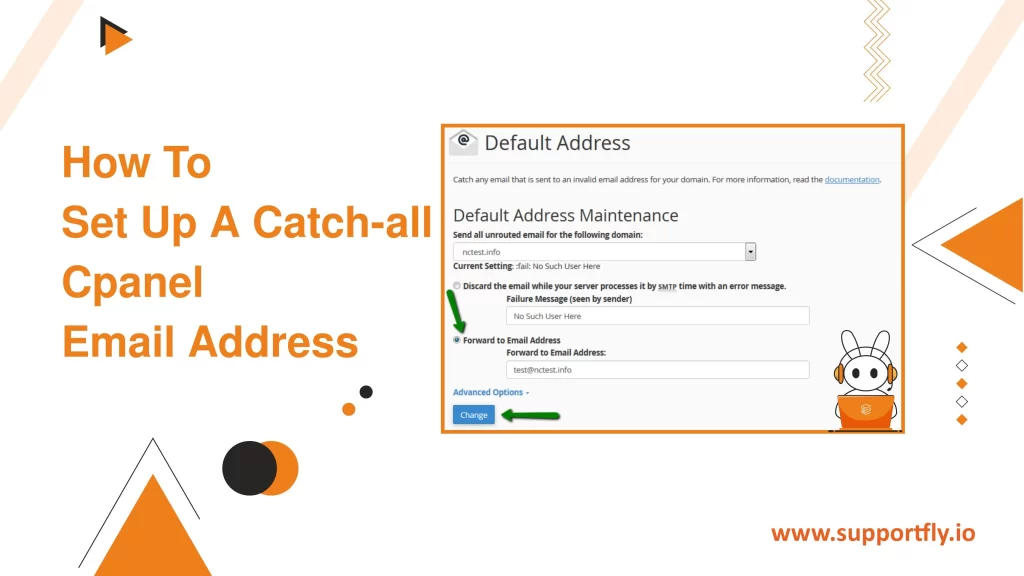
3. Access Default Address: In the ‘Email’ section, click on the link that says ‘Default Address.’ You can see what it looks like in the image below for help.

4. Set up Forwarding: A new page will appear; here, select ‘Forward to Email Address.’ Then type in the email address where all messages should be sent.

5. Save Your Settings: Click on ‘Change’ to save your settings and finish up.

That’s it!
You’ve now set up your default email to catch all emails sent to your domain, ensuring that your catch-all email account is successfully configured.
How to Delete Catch-All Emails
In the Default Address section, you can modify the setting based on what you prefer:
- Discard with a message to the sender: Here, you can specify the message that will be sent back to the sender in the “Failure Message” field.
- Discard without notification: For this option, click on “Advanced Options” and select “Discard (Not Recommended).”
After making your selection, click on “Change” to apply the new settings. Remember, you can always set up a new catch-all email address whenever necessary.
Conclusion
Setting up a catch-all email address via cPanel is an effective way to ensure you don’t miss any emails due to errors in addressing. While very useful, it’s essential to regularly monitor the catch-all account for spam, as it can become a target given that it captures emails addressed to any made-up email under your domain. With the steps outlined above, you can easily set up a catch-all email address and manage your emails more efficiently.


